
by Jamison Sills aka "The husband"
Erin and I have always wanted to have a garden in the backyard. But as many of you know, gardens can be a money pit, a time drain and often times all for naught when it is August an you have managed to grow a pile of dry dirt. We also have a significantly sloped backyard which can make setting up a garden even more difficult and costly. So what was the solution to our situation? A cost effective, easy to maintain garden, that can be implemented in our backyard? After a bit of research online, we stumbled across a gutter garden!
What is a gutter garden you ask? Well, have you ever had to clean out your gutters after letting leaves build up in them for a few years? And when you did, did you notice little trees or grasses growing in the biodegrading leaves sitting in the bottom of your gutters? That is exactly what we set out to create! Only this time, we were going to eat those grasses and trees. Essentially, we set out to mount some gutters to our fence, fill em with dirt, and attempt to grow some plants! Here are 7 easy steps you can take to build a gutter garden just like we did. In just 2 hours!
1. Location
So where to start? Some people mount these on the sides of their house. As an Architect, I think this is a terrible idea, but you do what you want. Let me just say - holes in your house equals bad. I also wouldn't suggest using your own gutters! They are high off the ground and you need them to properly drain water away from your roof. Okay so, what is left? The easy answer is your fence! It is low to the ground, sturdy, and will not leak when things are screwed into it.
Here is a picture of the fence I chose. I purchased (3) 10'-0" lengths of gutter, so I found a section of fence with posts at about 8'-0" apart. One thing to watch out for. Depending on the orientation of your fence, you may need to add some additional 2x4 blocking to make sure you have a good, flush mounting surface, and you will also see in the picture below that I added a 3rd center post using 2x4s because spanning 8'-0" with gutters loaded with soil would not hold up over time.

Another issue to consider is the orientation towards the sun. Depending on what you want to grow, you will likely need plenty of sun exposure. I selected a fence face that faced the morning sun. That way it would get good exposure in the morning, but the fence would help protect the garden during the hot afternoon and evening periods.
2. Build the Gutters
Next, I set out to assemble my gutters. 10'-0" lengths of gutter will run about $7 a piece, but don't forget to purchase right and left end dams for each gutter you are installing. These will be about $1.50 each. Gotta have those end dams or all of your soil will fall out the ends. Make sure they are on their really well. I hammered and crimped each of the end dams on to the gutter to help ensure they stay on over time. So far none have come off!


End dam on - sorry for the blurry picture. Still trying to learn how to use our camera... It has only been 6 years.
3. Drain Well
You will want to drill some drainage holes in the bottom of the gutters. I used a 1/4" metal bit and spaced 6" apart on center and alternated front to back as you can see below. I added a few extra at the ends. I will show you why next.

4. Mounting
Now you are ready to mount the gutters on the fence. 'Bout time! We have been working for a hour and I'm getting hungry! So I chose to mount mine in a random / uneven pattern. I did this to deal with the slope of the backyard and to look a bit more interesting. Feel free to keep them parallel if it is going to drive you crazy. Don't forget to mount them high enough off the ground to run a lawn mower underneath if you need to. Also, remember a step before about adding extra holes at the end? I did this because I planned to install all of them on an angle. Sloping the gutters will help them drain and the cool thing is that they will drain into the one below!

Now your local home improvement store will carry the handy dandy gutter mounts that are pictured below. They run about $2 each. Buy one for each mounting position on the gutter. So I bought 3 for each gutter totaling 9 in all. These are galvanized and come with the mounting screw. No need to fool with other screws or gutter spikes. These work great.

5: Drainage (again)
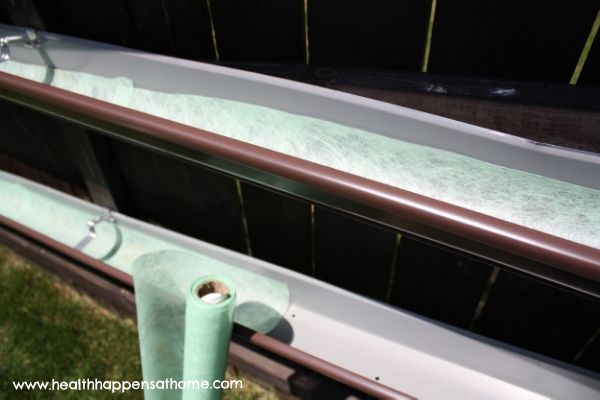
We are almost ready to plant! But one last step I recommend before breaking out the green thumb. Be sure to add strips of landscaping fabric in the bottom of each gutter so that the dirt will not leak out the drainage holes, but the water still can. This fabric cost me about $8 bucks and I only used a bit. But I have heard of other people using cloth or styrofoam. This seemed like the best solution to me.
6. Dirt
Now the gardening starts! Your gutter garden is ready! First you need to fill the gutters with plenty of soil. Remember it will settle over time. Here I am with my son and daughter (not pictured). They had a great time helping after watching me all afternoon. We used (1) 64 quart bag of potting soil ($15). I decided to buy the type with the moisture control because I knew the elevated gutter garden would dry out quickly and require lots of watering. So far, it seems to be a good choice.
So there you go! Without the cost of the seeds, we spent $70-$75 dollars. About $25 each gutter level. And to get to the point of gardening (minus the trips to Loews or Home Depot) it took me a total of 2 hours to set this up.

7. Time to Plant.
We decided to plant each gutter differently. Now, whatever you pick, remember that they need to be small, shallow rooted plants like lettuces, herbs, radishes/onions, etc. We decided to plant strawberries along the top, mixed greens seeds along the middle and spinach along the bottom. once you have decided, plant your seeds in the gutters according to the directions on the pack. Water well and watch them grow!


So how did we do? The first round was a moderate success. We have learned a lot already. First off, the strawberries did not do well. We picked a few, but mostly everything died off in the heat. The spinach and mixed lettuce greens both did great. Especially the greens. Actually too well. The pictures above were taken about 10 days before we harvested. What we did not anticipate was the amount of the "crop"! we had way too much and a lot of it went bad. I would estimate (depending on how close you space your seeds) 1' - 1.5' of gutter produced enough to two large salads. The problem was we had about 20' of gutter ready at once! (except the strawberries) So, if you do decide to start your own, I would suggest staggering your planting. Maybe 3 feet at a time every week. That way you can have fresh lettuces and spinach all summer long! I think our seeds only cost $4 and we only used less than half. So now that we have harvested, we are planing again... but this time staggered!

One last tip. Watering: Try and locate your garden near your water source for ease because since the garden is elevated, you need to water often. You can see from this picture, we missed a day or two and the tender lettuces started to wilt. So water often! You hate for all your hard work to be wasted because you forgot to water! Email me through the contact info if you have any questions or suggestions. I'm always looking to make things better or a new project to take on.
I hope this was helpful and motivating! We have had fun doing it and it should pay off over time. It is great having a fresh and accessible supply of lettuces available in the backyard. It also takes up practically zero room to boot! Maybe it will even motivate me to build some garden terraces in my back yard to plant some larger vegetables? Nah, not yet...
Jamison